Lobe:- Microsoft's Simplified Image Classification Application

Electronics Engineer and Technophile with the ability to decipher subtle and nameless notions.
“Machine intelligence is the last invention that humanity will ever need to make.” -- Nick Bostrom
The world that we exist in has indeed undergone technological change. From the devices in our wallets and homes to the computers on our desks, computers seem to be everywhere. In the present, advances in artificial intelligence (AI) and deep learning are enabling scientists to cure cancer more successfully, farmers to increase food production while using fewer natural resources, and international communication between individuals of different languages.

But in many respects, we're only beginning to use AI to its maximum capabilities. This is predominantly due to the fact that even for seasoned data scientists and engineers, developing AI and creating deep learning models are sluggish and challenging procedures.

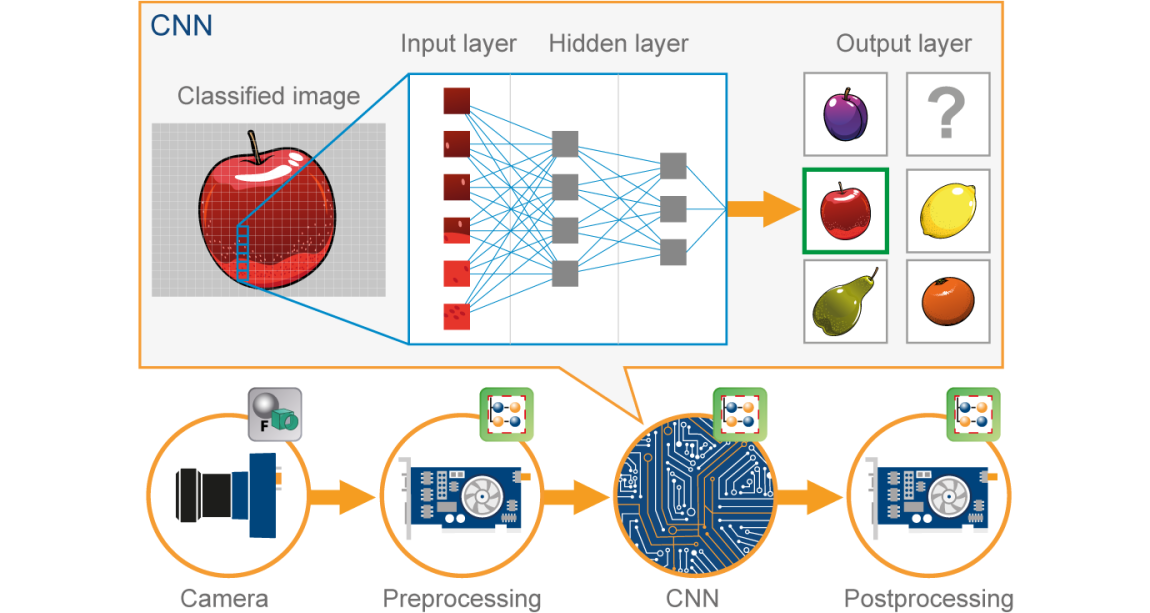
Artificial intelligence (AI), which is predicated on multiple-layered artificial neural networks (ANNs), has gradually emerged as a synonym for deep learning. Image recognition is the most prevalent application of AI in the healthcare industry, notably for the disciplines of cardiology, pathology, radiology, and ophthalmology. Convolutional neural networks are the most frequently employed computational strategy for image recognition (CNN).
The key phrases that will be employed throughout my article will be revealed to you now. Let's get going!
Convolutional Neural Networks (CNN)
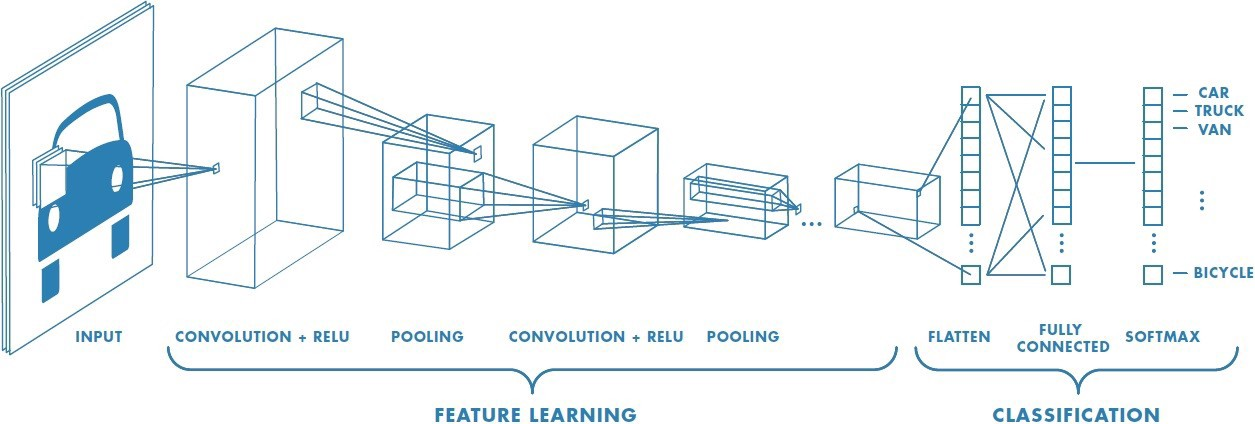
The goal of this domain is to consider giving computers the ability to see and understand the world, likewise to humans. They will then be able to use this insight for a wide range of tasks, including image and video recognition, image analysis and classification, media recreation, recommendation systems, natural language processing, etc. Over time, a Convolutional Neural Network method in particular has been developed and optimised, leading to breakthroughs in computer vision.
Making a CNN requires you to be a data scientist with sophisticated mathematics and programming abilities, in addition to being a pro at using tools like TensorFlow and PyTorch. In practice, this disqualifies the majority of those who are engaged in using and learning more about picture recognition.
Kernel: Convolution Layer
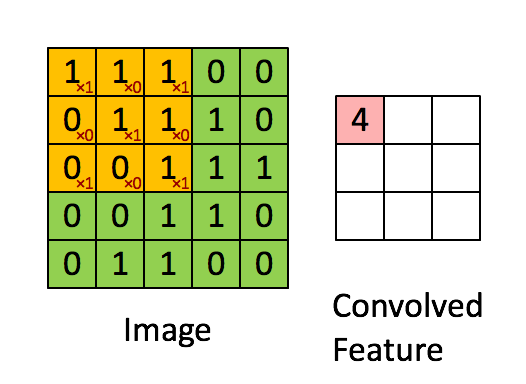
Because Stride Length = 1 (Non-Strided), the Kernel shifts 9 times, each time conducting a matrix multiplication operation between K and the region P of the picture over which the kernel is hovering.
With a given stride value, the filter travels to the right until it has parsed the entire width. Moving on, it bounces down to the picture's beginning (left) with the same Stride Value and repeats the procedure until the entire image is traversed.
Why Are CNNs So Helpful?
Three significant reasons explain why CNNs are frequently used for deep learning:
- CNNs do not necessitate manual feature extraction because they learn the features on their own.
- Outcomes from CNNs for recognition are quite precise.
- You may improve on pre-existing networks by retraining CNNs for new recognition tasks.
A multilayer perceptron-like system that has been optimised for low processing demands is used by a CNN. An input layer, an output layer, and a hidden layer with many convolutional layers, pooling layers, fully connected layers, and normalising layers try to compensate a CNN's layers. A system that is substantially more efficient and quicker to train for image processing and natural language processing arises from the elimination of restrictions and improvement in image processing efficiency.
We shall now switch the topic to Lobe since we have grasped CNN.
Learning about Lobe
The power of machine learning is ground-breaking. It's revolutionising the way we create software and enabling technological advancements we never even dreamed of a few years ago. However, because machine learning is difficult, only a few specialists are currently using it. With the aid of the simple-to-use tool Lobe, you will train machine learning models on your computer for almost nothing and without any existing understanding. You may transport your model to any platform of your choice, and it functions locally on both the Mac and the PC.
By placing your images in the foreground and fading them into the background as the primary link between your notions and your machine learning model, Lobe employs a unique, more compassionate approach to machine learning.
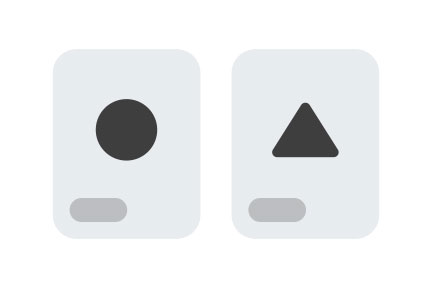
Additionally, Lobe breaks down machine learning into three simple phases. Gather and annotate your pictures. Train and comprehend your outcomes. Then experiment with your model to make it better.
Lobe does the following actions or makes them accessible to you:
- Identify your examples.
- Develop a model.
- Analyze training outcomes.
- Test out your model.
Use your model in an app by exporting it.
Let's learn each one in turn. But first, let's explore what idea it is built on and what method Lobe actually employs!
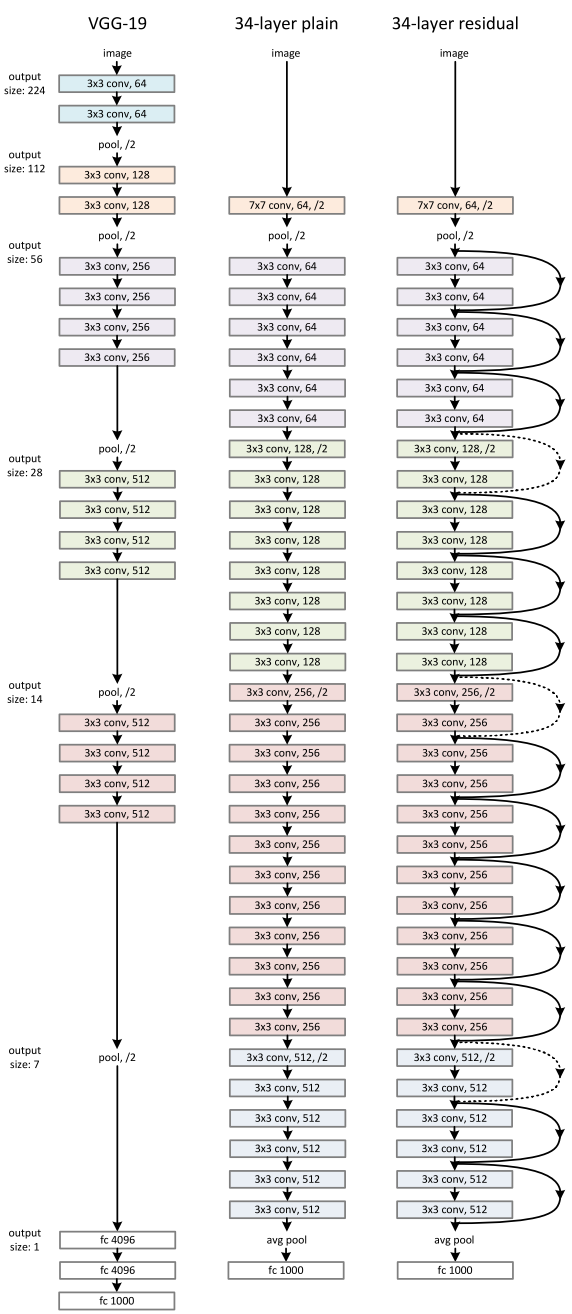
The CNN ResNet-50 V2 is the foundation of the image recognition system Lobe. There are 50 layers in the CNN, as indicated by the number 50. Let me first walk you through the Resnet concept.
What is Resnet?
In their 2015 publication "Deep Residual Learning for Image Recognition," Kaiming He, Xiangyu Zhang, Shaoqing Ren, and Jian Sun created an unique kind of neural network known as ResNet, or Residual Network. You might infer that the ResNet models were quite productive from the following:
- Having a top-5 error rate of 3.57%, won first prize in the ILSVRC classification competition in 2015. (A model ensemble)
- Won first prize in the categories of ImageNet detection, ImageNet localization, Coco detection, and Coco segmentation at the 2015 ILSVRC and COCO competition.
- ResNet-101 is used in Faster R-CNN to replace the VGG-16 layers. They noticed 28% relative improvements.
- Networks of 100 layers and 1000 layers that are well trained.
ResNet network employs a VGG-19-inspired 34-layer plain network design, to which the bypass link is incorporated.
ResNet is required? Why?
We stack extra layers in the deep neural networks, which improves accuracy and performance, often in order to handle a challenging issue. The idea behind layering is that when additional layers are added, they will eventually reveal features that are more complicated. For instance, when recognising photographs, the first layer may pick up on edges, the second would pick up on textures, the third might pick up on objects, and so on. However, it has been discovered that the conventional Convolutional neural network model has a maximum expected threshold.
An open-source, Python-based neural network framework called Keras may be used with TensorFlow, Microsoft Cognitive Toolkit, R, Theano, or PlaidML. It is made to make deep neural network experimentation quicker. The following ResNet implementations are part of Keras Applications and offer ResNet V1 and ResNet V2 with 50, 101, or 152 layers.
- ResNet50
- ResNet101
- ResNet152
- ResNet50V2
- ResNet101V2
- ResNet152V2
ResNetV2 and the original ResNet (V1) vary primarily in that V2 applies batch normalisation before every weight layer. In our case, we are going to learn about CNN Resnet50V2.
ResNet-50
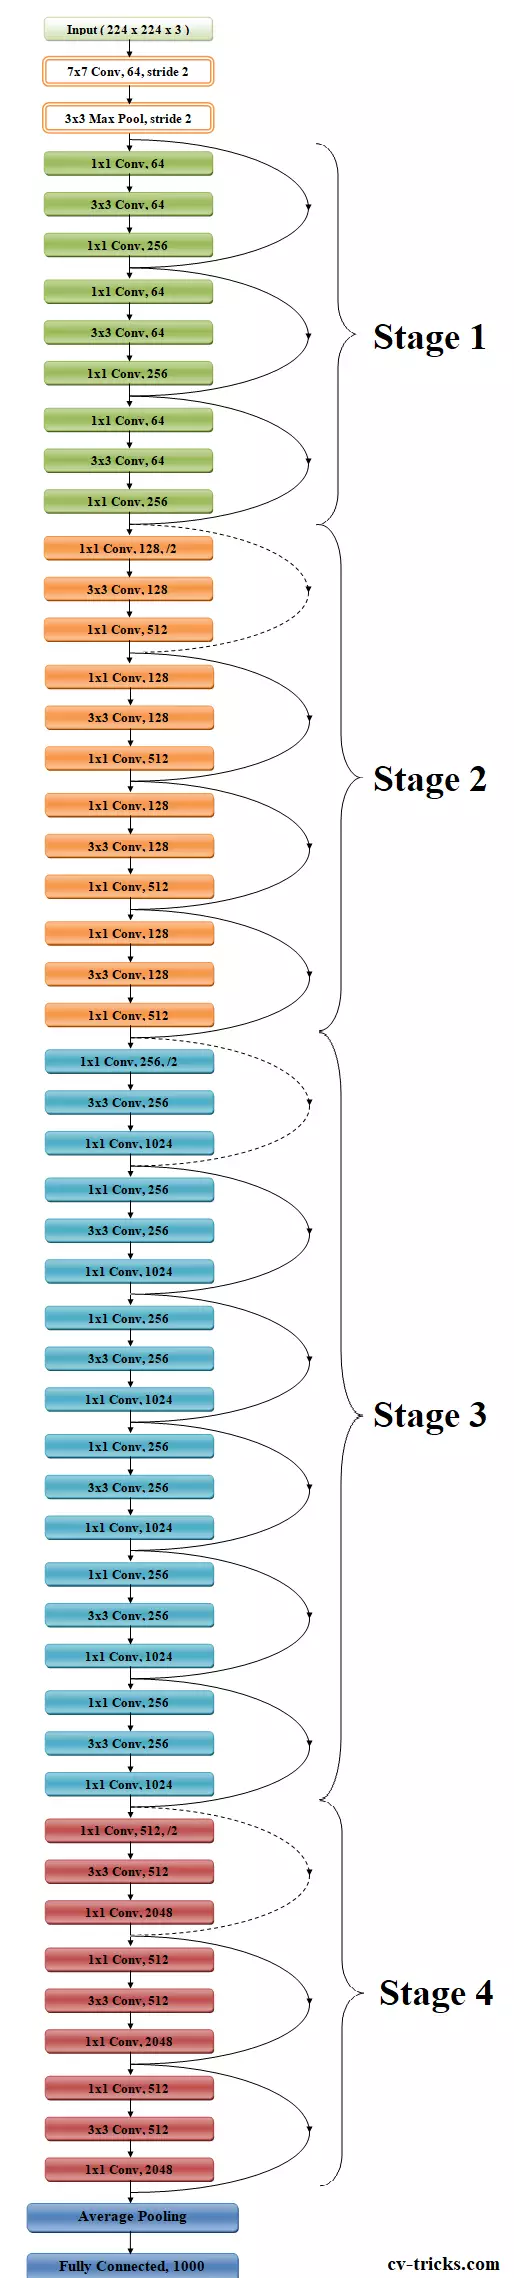
We'll now discuss ResNet50's architecture. According to the figure above, ResNet50's design is divided into four stages. The network may accept an input picture with height, width, and channel width that are multiples of 32. To make things clear, we'll assume the input size is 224 × 224 x 3. Every ResNet design uses 77 and 33 kernel sizes for the initial convolution and max-pooling operations, respectively.
The network then enters Stage 1, which consists of 3 residual blocks with a total of 6 layers. All three levels of the stage 1 block's convolution process employ kernels that are 64, 64, and 128 bits in size, respectively. The identity relationship is represented by the curved arrows.
Bottleneck design is applied to deeper networks like ResNet50, ResNet152, etc. A total of three layers are piled on top of one another for each residual function F. Convolutions (1, 3, and 1) make up the three levels. The reduction and subsequent restoration of the dimensions are accomplished by the 11 convolution layers. With lower input and output dimensions, the 33 layer is left as a bottleneck.
I won't be going into the details of coding the Resnet50 in Keras because it will be too complicated to understand. But if you want an explanation of this, ping me in the message section :)
ResNet – V2
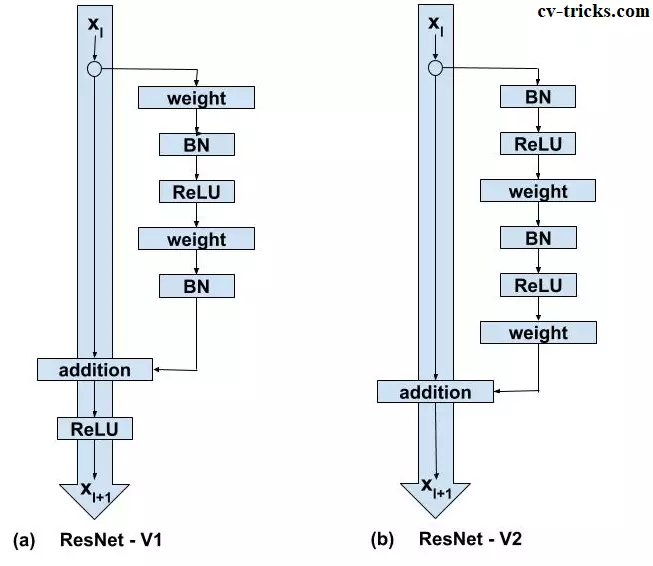
The main focus of ResNet50 version 2 is switching from post-activation to pre-activation of weight layers. ResNet V2 focuses primarily on transforming the second non-linearity into an identity mapping, meaning that the results of the addition operation between both the identity mapping and the residual mapping should be forwarded to the following block for subsequent operations in their original form. ResNet V1's addition operation, however, goes via ReLU activation and then conveys the output as the input to the following block.
The following are the main changes between ResNet - V1 and ResNet - V2:
- ResNet V1 performs the addition operation between x and F and then adds the second non-linearity (x). Since ResNet V2 has eliminated the final nonlinearity, the path from input to identity connection is now straightforward.
- Before multiplying the input by the weight matrix, ResNet V2 conducts Batch Normalization and ReLU activation (convolution operation). Convolution is carried out via ResNet V1, then Batch Normalization and ReLU activation.
Crucial ResNet Spotlights:
- Batch Normalization is the foundation of ResNet. The input layer is modified by batch normalisation to improve network performance. Covariate shift is an issue that is reduced.
- The Identity Connection is a technique used by ResNet to help shield the network from the vanishing gradient problem.
- To improve network performance, the Deep Residual Network adopts a bottleneck residual block architecture.
Image Classification
Associating one (single-label classification) or more (multi-label classification) labels to a given image is the job of image classification, also known as image recognition. Image classification is a credible task for comparing contemporary architecture and approaches in the field of computer vision. Convolutional neural networks (CNN) have emerged as the most cutting-edge technology for image classification. Simply speaking, image classification is the technique of categorising and labelling groups of pixels or vectors inside an image in accordance with predetermined criteria.
The significance of image classification
Our time is the digital age. We now produce enormous amounts of data as a result of the Internet of Things (IoT) and artificial intelligence (AI) becoming ubiquitous technologies. Data can take on several forms, such as audio, text, images, or a combination of any of these. Images account for a sizeable portion of the development of global data, whether in the form of pictures or movies. The creation of highly scalable systems that use machine learning for distributed data processing is made possible by AIoT, the merging of AI with IoT.
Foundation of Computer Vision is Image Classification
The primary issues in the field of computer vision include object detection, segmentation, classification, and localisation of images. Among these, image classification might be thought of as the core issue. It serves as the foundation for more computer vision issues.
The two primary kinds of image classification techniques are supervised and unsupervised image classification techniques.
Unsupervised Classification
A completely automatic methodology called unsupervised classification does not use training data. It implies that without the necessity for human involvement, machine learning algorithms are utilised to evaluate and cluster unlabeled information by identifying hidden patterns or data groupings.
Supervised Classification
In order to train the classifier and then classify newer, unknown data, supervised image classification algorithms require previously classified reference samples (the ground truth). The method of visually selecting training data samples from inside the image and assigning them to pre-selected categories, such as flora, roads, water resources, and buildings, is hence known as the supervised classification approach. This is done to produce statistical measurements that may be used to analyse the entire picture.
Single-label Classification
The most frequent classification challenge in supervised image classification is single-label classification. As the name implies, single-label categorization only uses one label or annotation per picture. As a result, the model only produces one value or prediction for each picture it encounters. A vector with a length equal to the number of classes and a value indicating the score that the picture corresponds to this class is the model's output.
Multi-label Classification
Each image may have more than one label in a classification job known as "multi-label classification," and some photos may carry all the labels at once. The problem statement is more complicated than single-label classification, despite the fact that it appears to be comparable in certain ways.
What is the process for Image classification?
A pixel-based picture is examined by a computer. It accomplishes this by looking at the picture as an array of matrices, with the size of each matrix relying on the resolution of the image. Simplest terms, image classification in the viewpoint of a computer is the assessment of this statistical facts. Image classification in digital image processing is performed out by detecting and classifying pixels into predetermined groups, or "classes."
In order to reduce the stress on the final classifier, the algorithms divide the image into a number of its most pronounced characteristics. These qualities help the classifier determine the meaning of the image and the possible class it belongs to. The most crucial stage in classifying a picture is the characteristic extraction procedure because the other processes rely on it.
I will now walk you through the key phrases in the Lobe application! I hope this is still understandable. If not, don't worry, it will be sooner :).
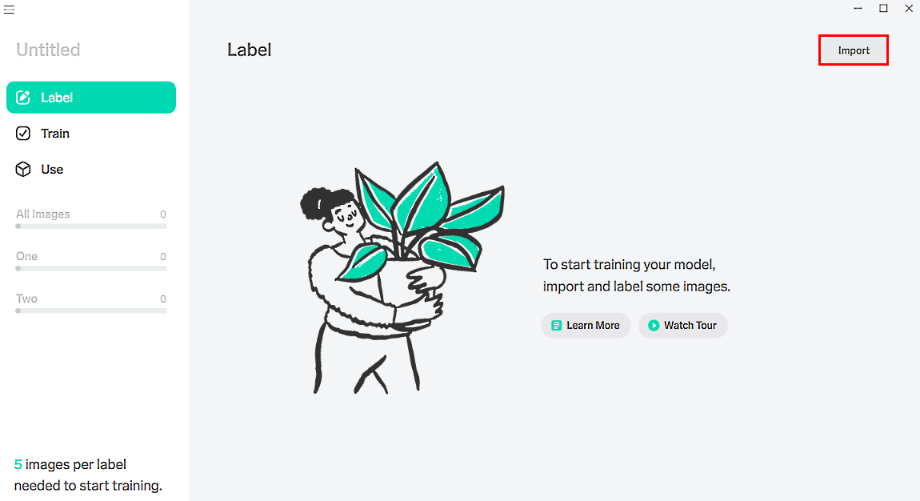
Labelling your model
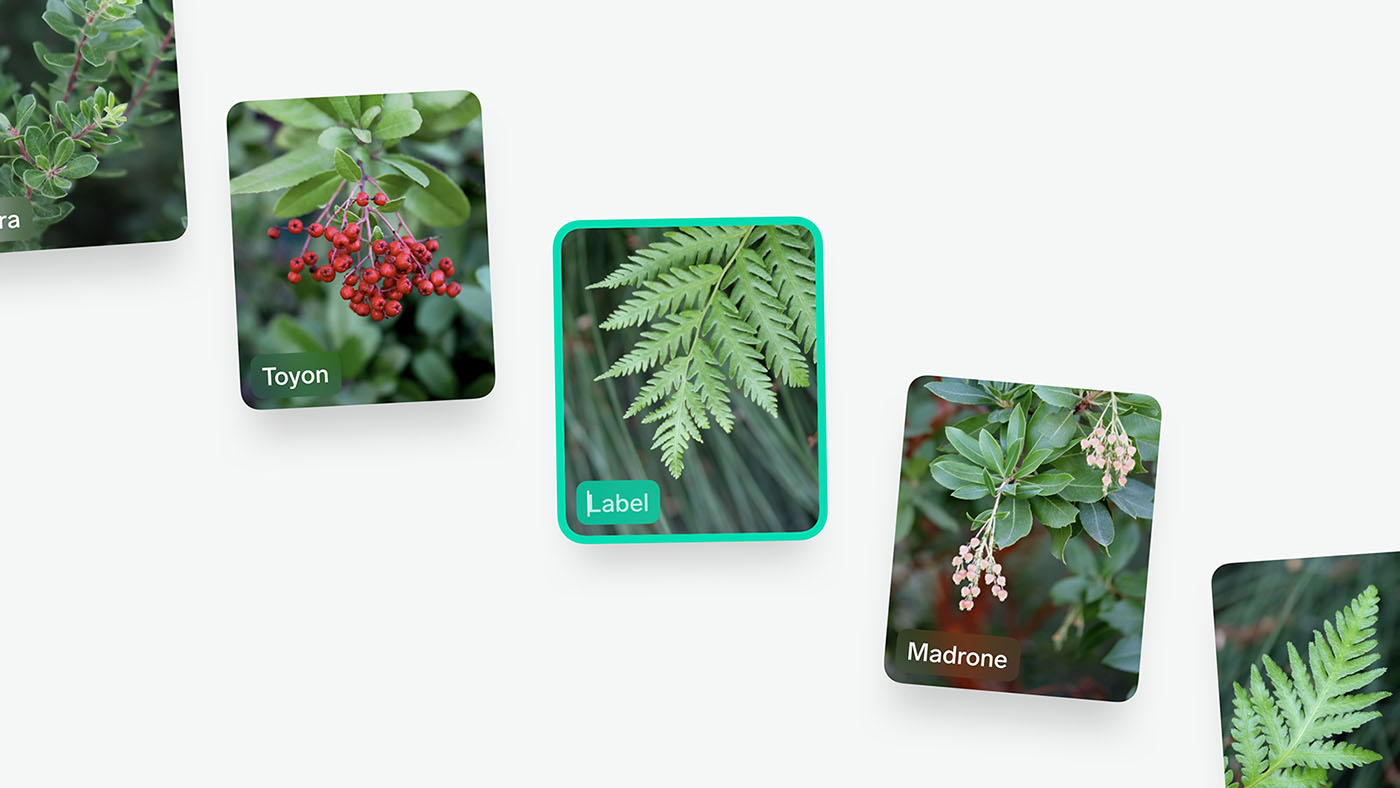
Collecting your images, importing them, and giving them names is the first stage in building a machine learning model. With Lobe, you may drag in a folder of images from your computer or capture short bursts of images using your webcam. You may rapidly annotate the photos to produce a dataset while they are being loaded.
Making data collecting and labelling simple makes one of the most difficult parts of creating machine learning models easier, allowing you to concentrate on your challenge and gain a deeper understanding of your machine learning model.
Training your model
Without even any setup or configuration, Lobe will commence immediately training a machine learning model once you have imported and identified the images. You may continue using Lobe to categorise images and expand your dataset since training disappears into the background and happens automatically. As soon as you get results from training, Lobe will offer you real-time feedback on how well your model is doing. This will make it more straightforward for you to see the advantages and drawbacks of your model.
Playing or Testing your model

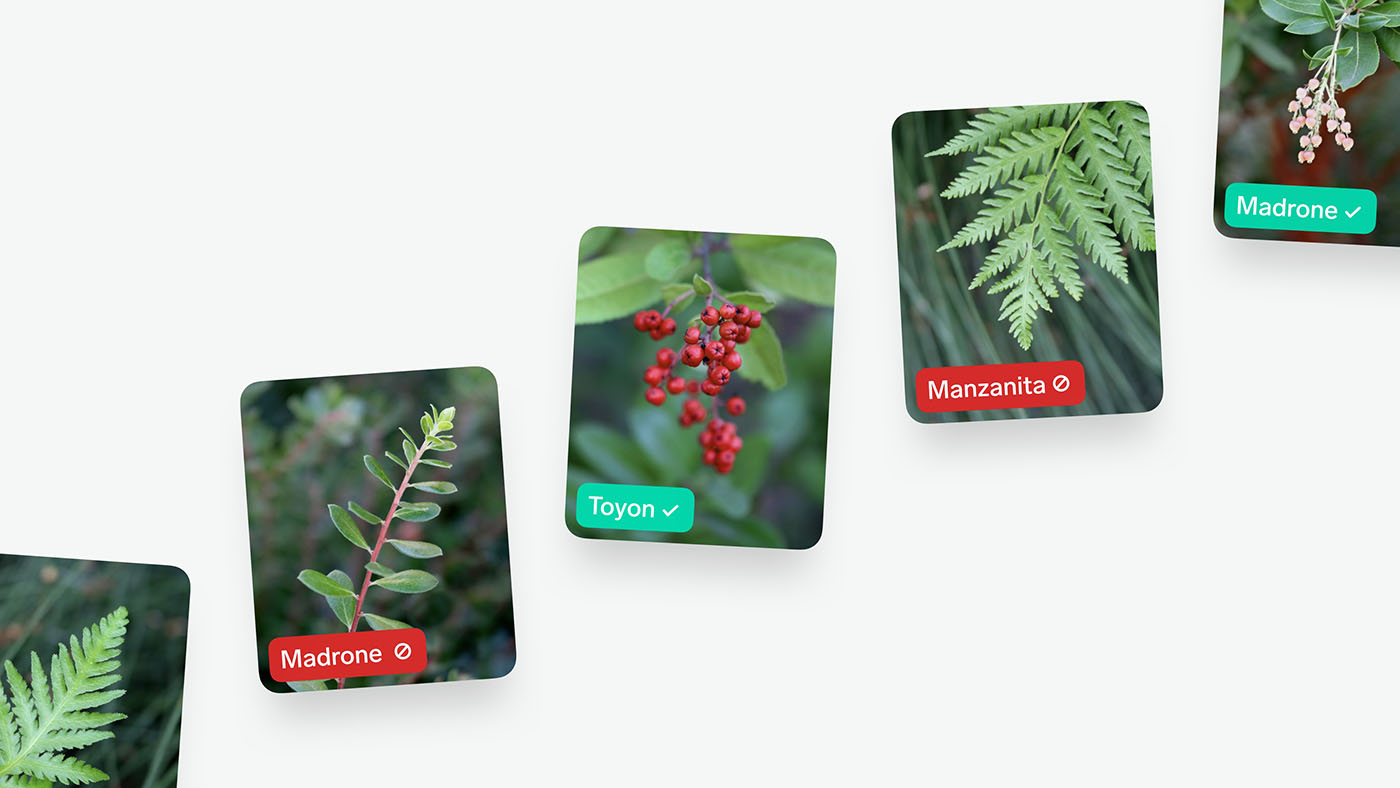
Utilizing your model in the actual world and testing its performance on photographs it has never seen before is the finest technique to comprehend how well it performs. Using your webcam or photographs from your PC, Lobe enables you to test out your model.
This enables you to assess your model's performance on fresh pictures. Lobe further enables you to enhance your outcomes by informing your model whether or not its forecasts were accurate.
Share everything
The first step in addressing a problem, creating a prototype for an idea, or even just learning is to build a machine learning model. Exporting your model so that you may utilise it in your app is the next step. Lobe makes it simple to export your model into a number of formats that are widely accepted in the industry and to ship it on whatever platform you want, whether it a Raspberry Pi, a smartphone, or even a server. You may leverage one of our beginning projects, which seamlessly integrate your model with an Android, iOS, Python, or web app, to make it even simpler.
I tried to verify the accuracy of Lobe. I wasn't at all let down :). That's how good Lobe is! I have attached a YouTube video of my own created ML model below. The same steps mentioned above are been followed in order to get an accurate model.
My Machine Learning Model
So, based on the article, we deduced that Lobe is a no-cost, user-friendly Microsoft desktop programme that enables you to create, maintain, and employ unique machine learning models. In order to classify photos into labels that accurately reflect their content, you may use Lobe to build an image classification model. This software has not yet included object detection or any other approaches, but it will sooner or later. I certainly hope you enjoyed reading my article and learned something new about Lobe. You may use this fantastic programme by Microsoft to create your own models and experiment with them. Thank you everyone!
To download Lobe app, visit this link.