


“The IoT is removing mundane repetitive tasks or creating things that just weren’t possible before, enabling more people to do more rewarding tasks and leaving the machines to do the repetitive jobs.” — Grant Notman
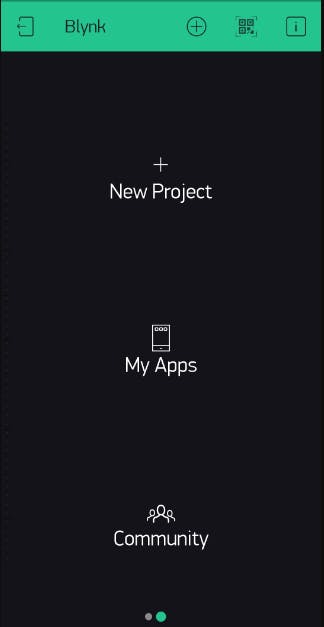
Blynk. Yes, I spelled it correctly. It's not the blinking of an eye, it's a hardware-agnostic IoT platform. Let us understand what this term means in detail!
Source:- open-electronics
Table of Contents
In simple terms, Blynk is a platform to rapidly design interfaces from your iOS and Android devices to control and supervise your hardware projects. It can control Arduino, Raspberry Pi, and the likes over the Internet. It is basically a digital dashboard with which you can drag and drop widgets to create a graphical interface for your project.
Blynk began a campaign to raise just over $49k in Kickstarter. On the 22nd of May, the platform was updated continuously. Innovative widgets for Twitter, push, and email inclusion has actually just been added to the app.
Let's dissolve the Blynk platform into smaller chunks so you can understand better.
What do I need to Blynk?
You must ask how I get started correctly? But you should be informed of some obvious things before we move on. Let me, therefore clarify it for you:-
- Hardware
A Raspberry Pi or Arduino or a similar package is used. (I'll give you a list of hardware that works with Blynk later on in the article.)
Blynk operates through the Internet. This implies that the hardware you pick should be capable of connecting to the internet. Some of the boards, such as the Arduino Uno, would require an Ethernet or Wi-Fi Shield to interact, while others, such as the ESP8266, Raspberry Pi with WiFi dongle, Particle Photon, or SparkFun Blynk Board, are already Internet-enabled. Even if you don't have a shield, you can attach it to your laptop or desktop via USB. Isn't it cool? As a result, the shield's barrier is removed for the time being.
- Smartphone
The Blynk App is a visually appealing interface designer. It's compatible with both iOS and Android, so no clashes here, please.
How to Download Blynk on different Platforms?

Highlighting Features
The API and UI are the same for all supported hardware and devices.
Connection to the cloud using: WiFi, Bluetooth and BLE, Ethernet, USB (Serial), GSM.
Widgets that are simple to use.
No coding is required for direct pin manipulation.
Sending emails, tweets, and push notifications, among other things.
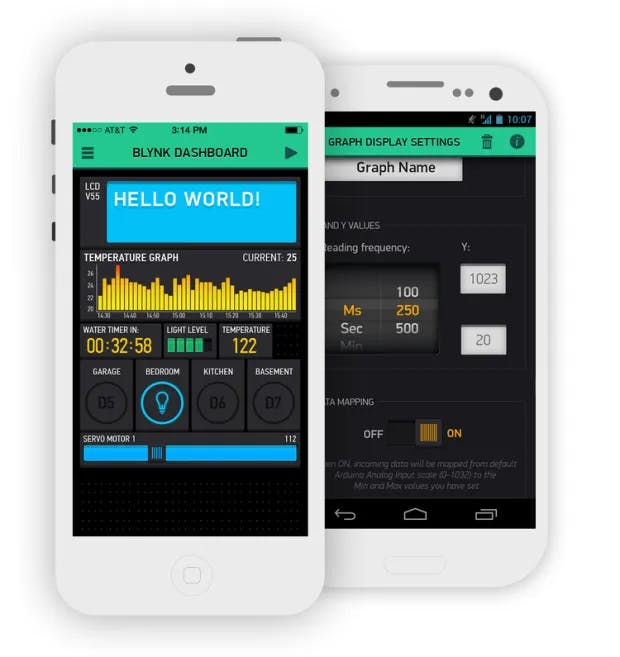
Monitoring historical data using the SuperChart widget.
Blynk's Operation
The platform is made up of three primary components:-
Blynk App: - allows you to develop stunning interfaces for your projects by utilizing the many widgets that blink offers.
Blynk Server:- It is in charge of all interaction between the smartphone and the hardware. You can use our Blynk Cloud or set up your own private Blynk server. It's open-source, can manage a large number of users, and can even run on a Raspberry Pi.
Blynk Libraries:- It enables communication with the server and handles all input and output commands for all popular hardware platforms.
Consider this: whenever you hit a Button in the Blynk app, the message would be sent to the Blynk Cloud, where it mysteriously trickles down to your devices. It operates in the reverse direction as well, and everything unfolds in the blink of an eye!!! Cool ain't it?
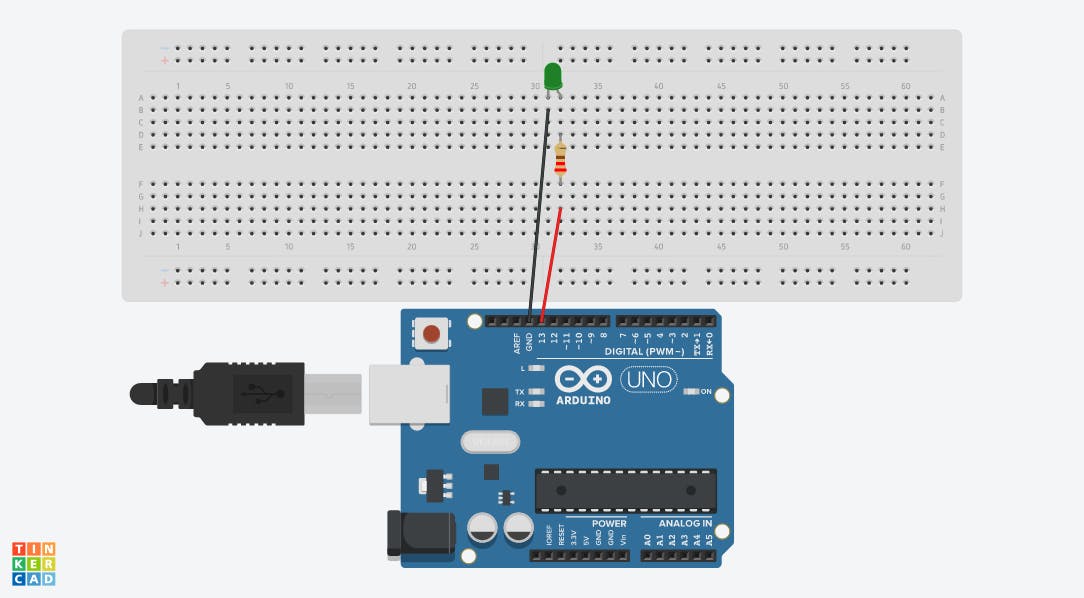
Let us use the Blynk App on your smartphone to turn on a LED attached to your Arduino Uno.
Schematic Diagram
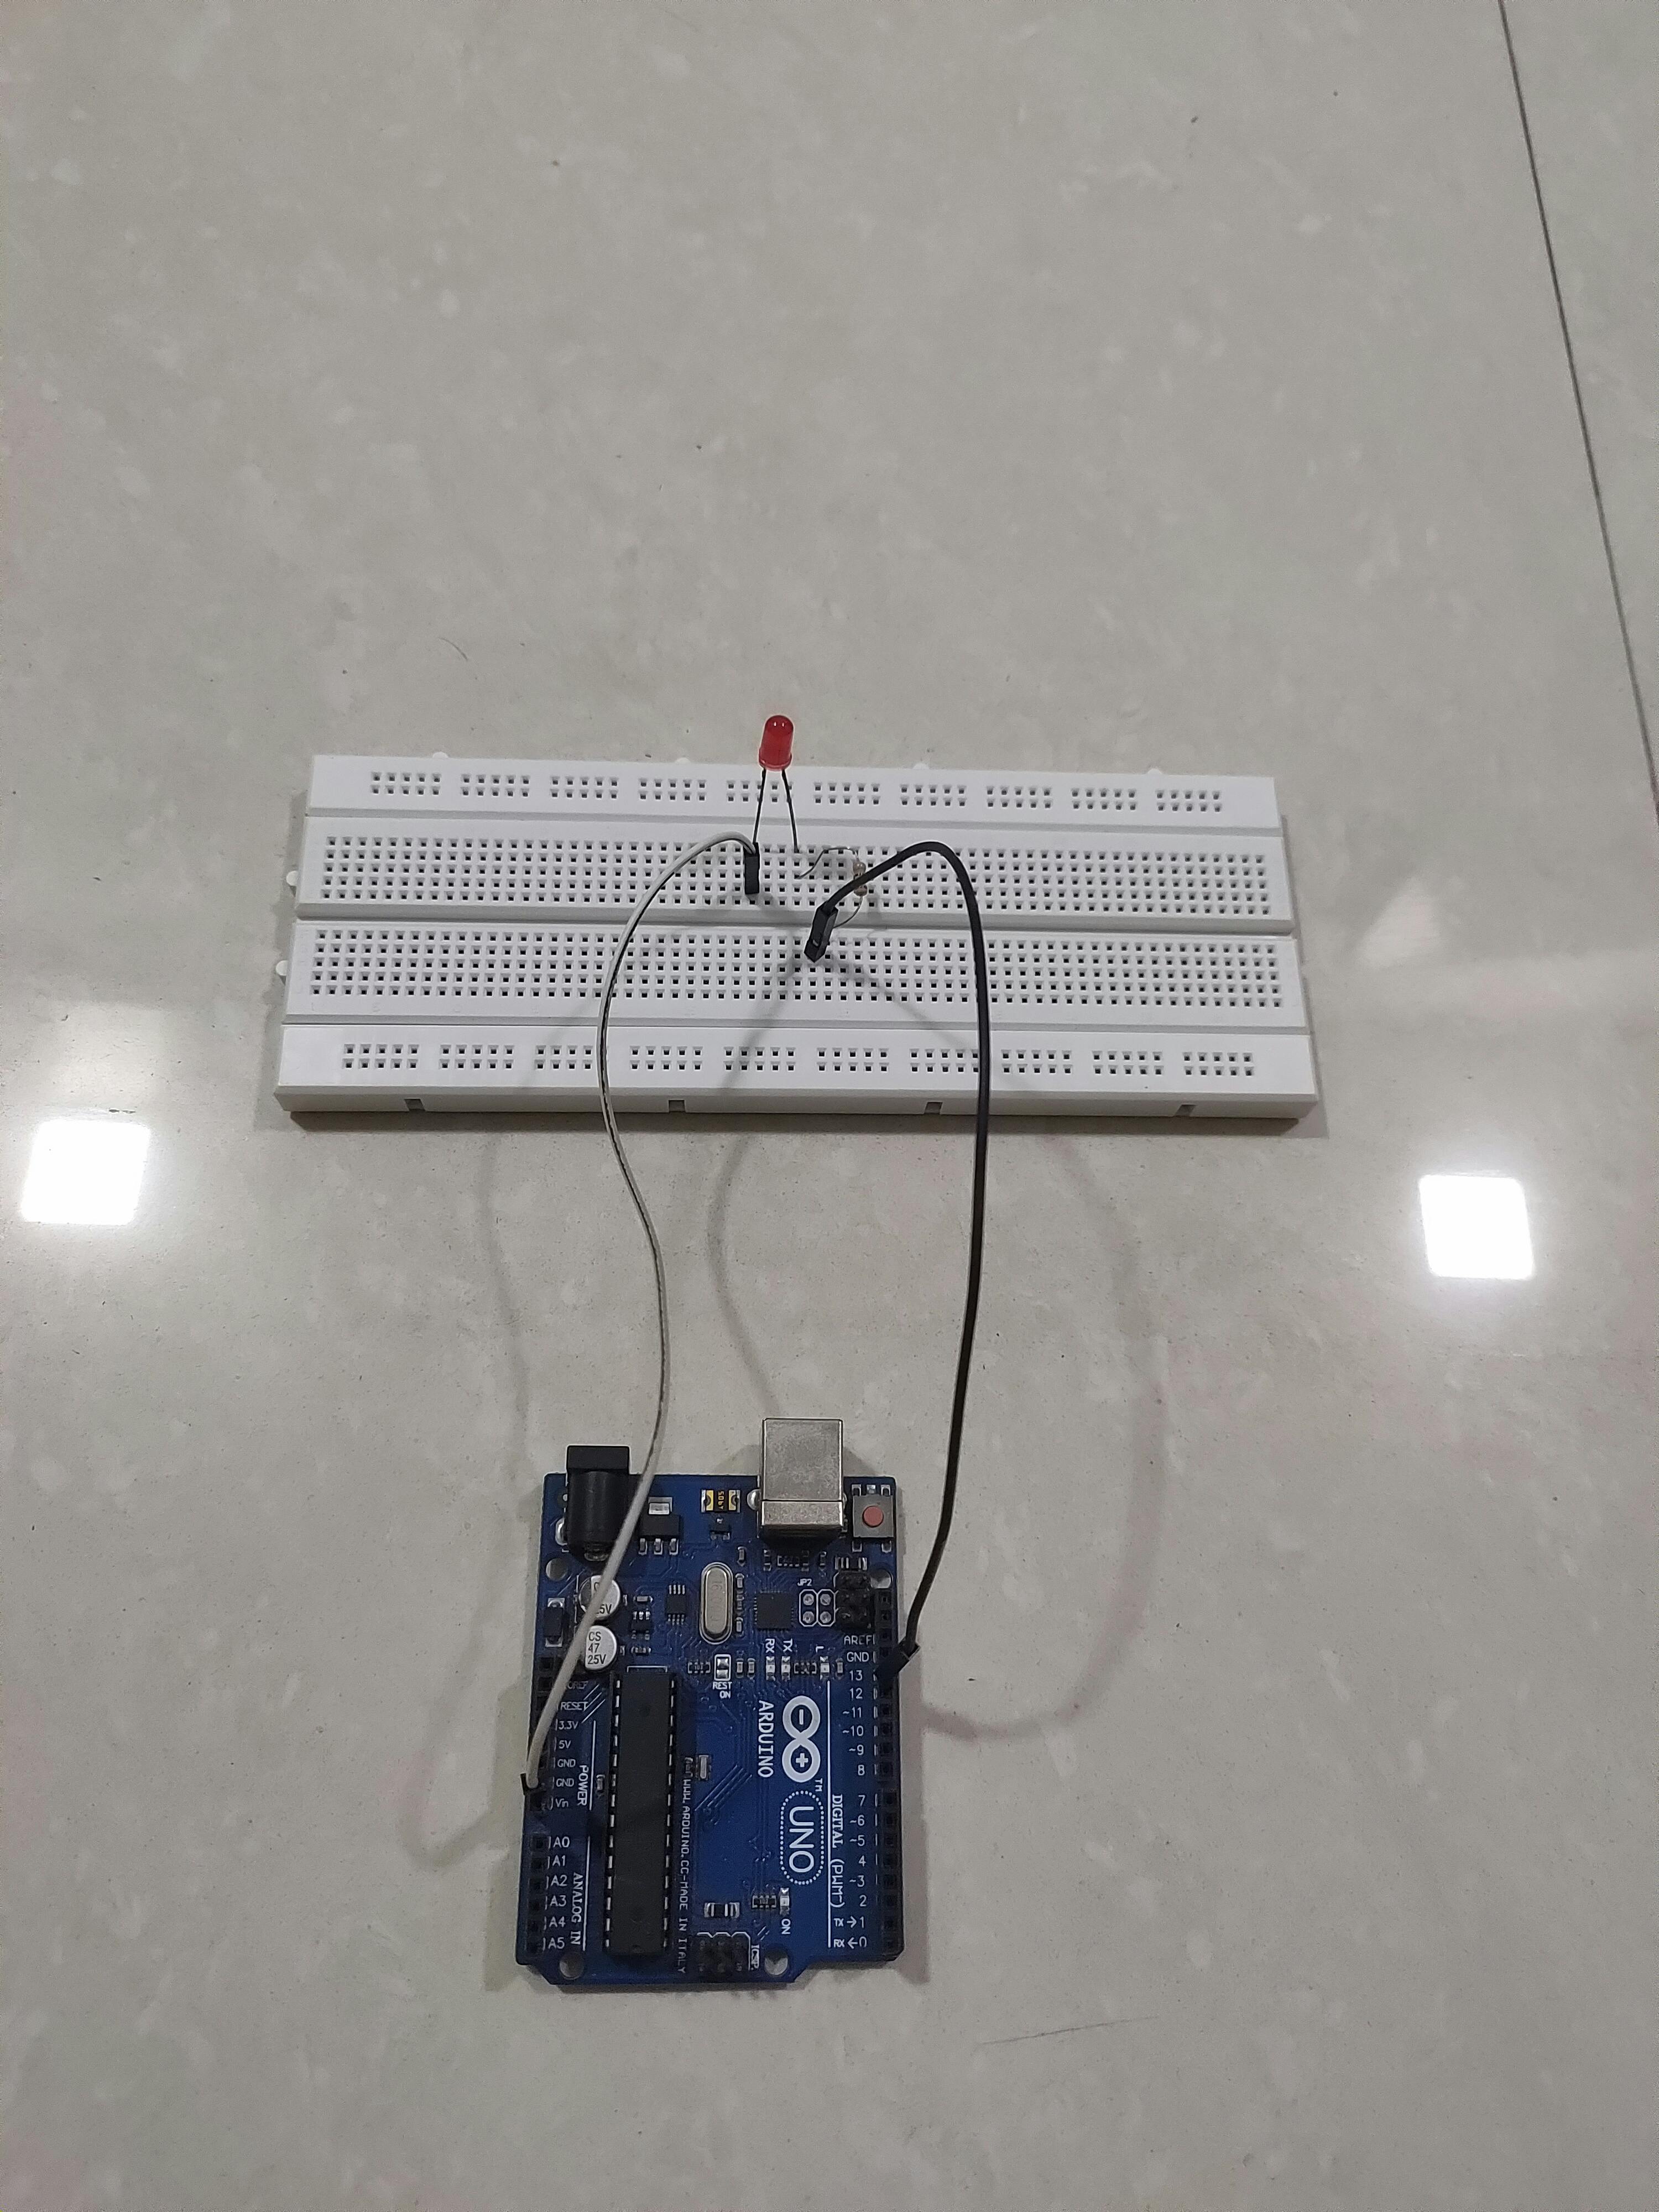
Actual Circuit
NOTE: - I'm going to include screenshots from this project that I worked on back then. I'll also provide a video to help you understand how this project works.
Components(Hardware and Software required)
Hardware
Arduino Uno

Source:- store.arduino.cc
LED(Any colour would do)
Source:- flipkart
Software
Blynk App
Source:- play.google.com
TO DOWNLOAD THE APP, SCROLL UP FOR THE LINK.
Source:- blog.eduguru.in
Blynk Library for PC (Follow the instructions carefully)
Download:- 👉🏻 Blynk library 👈🏻
Step 1:- Create your Blynk Account
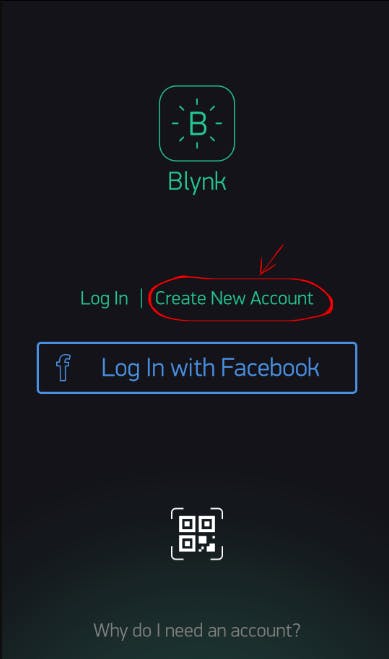
Upon downloading the Blynk App, you must establish a new Blynk account. Log in to the Blynk app and start a new project.
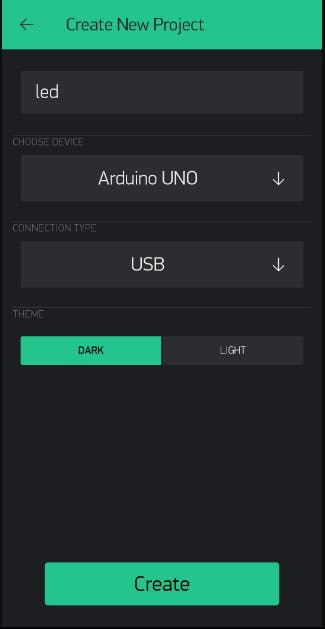
Step 2:- Start a New Project
Begin by creating a new project once you've successfully entered into your account. Give your project a title. Select Arduino UNO as the device. Choose USB as the connection type(Because Arduino doesn't have a Wi-Fi shield inbuilt in itself). Click Create. An Auth token will be sent to your registered email.
Step 3:- Auth Token
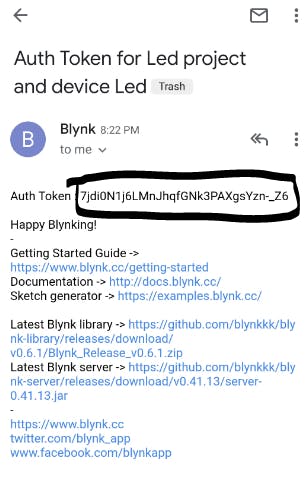
The Auth Token is a one-of-a-kind identification that is required to connect your device to your smartphone. Each new project you start has its own Auth Token. After creating a project, you will receive an Auth Token through email. You can also directly copy it. Check your inbox for an Author Token.
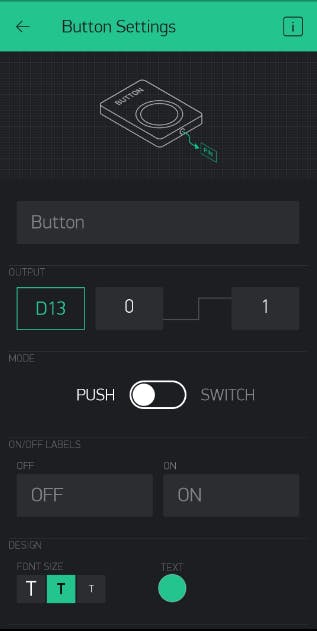
Step 4:- Add a Button from the Widgets
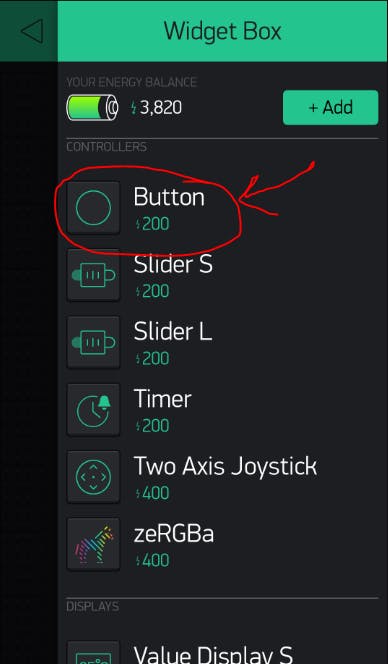
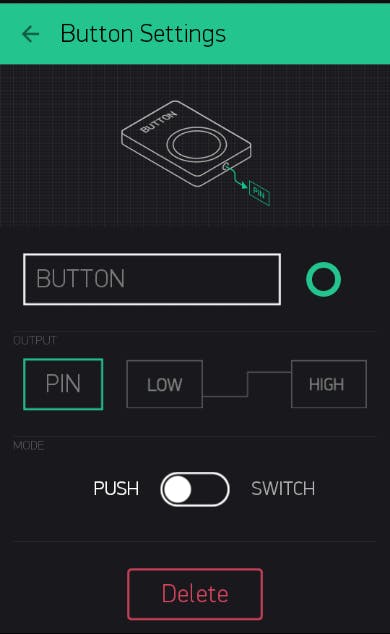
Because your project canvas is currently empty, let's add a button to control our LED. To access the widget box, tap anywhere on the canvas. Add a Button. Click on the button you created. Button Manager appears. Select the Digital 13th pin in the output.

Step 5:- Add Auth Token in your Code
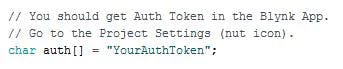
Copy and paste your Auth Token into your Code. Follow the path to set Programmer to "Arduino as ISP"(Tools>Programmer>Arduino as ISP). Choose the port on which Arduino Uno is connected(Tools>Port). Compile the code in your Arduino IDE.
Step 6:- Open your Command Prompt

Launch Command Prompt. Write the following command in the cmd:-
cd "Your Blynk Scripts address"
and then press Enter.
How do I get the Blynk script address?
A:- You have to first download the Blynk Library for PC. When you download the Arduino IDE software, you must unzip it to your C drive. You can also unzip the file on your desktop or any other drive. In our situation, I unzipped it and saved it on my C drive. Simply locate the Arduino folder on your C drive after unzipping. It's either in the Program Files or the Program Files (x86) folders. Then, as indicated in the screenshot, Go to libraries>Blynk>scripts.
Step 7:- Type the command in your Command Prompt and Run

Type:- (COM3 was the port to which my Arduino Uno was attached in my situation. It might be any number in your scenario. For eg:- COM4, COM5, or so on...)
blynk-ser.bat -c COM3
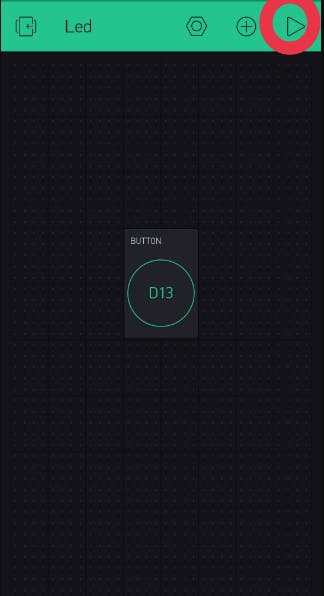
Press Enter. Click the Run button in the Blynk App. Now you can control your device with Blynk App.
Code
 /* Comment this out to disable prints and save space */
#define BLYNK_PRINT SwSerial


#include <SoftwareSerial.h>
SoftwareSerial SwSerial(10, 11); // RX, TX

#include <BlynkSimpleStream.h>

// You should get Auth Token in the Blynk App.
// Go to the Project Settings (nut icon).
char auth[] = "YourAuthToken";

// Attach virtual serial terminal to Virtual Pin V1
WidgetTerminal terminal(V1);

// You can send commands from Terminal to your hardware. Just use
// the same Virtual Pin as your Terminal Widget
BLYNK_WRITE(V1)
{

  // if you type "Marco" into Terminal Widget - it will respond: "Polo:"
  if (String("Marco") == param.asStr()) {
    terminal.println("You said: 'Marco'") ;
    terminal.println("I said: 'Polo'") ;
  } else {

    // Send it back
    terminal.print("You said:");
    terminal.write(param.getBuffer(), param.getLength());
    terminal.println();
  }

  // Ensure everything is sent
  terminal.flush();
}

void setup()
{
  // Debug console
  SwSerial.begin(9600);

  // Blynk will work through Serial
  // Do not read or write this serial manually in your sketch
  Serial.begin(9600);
  Blynk.begin(Serial, auth);

  // This will print Blynk Software version to the Terminal Widget when
  // your hardware gets connected to Blynk Server
  terminal.println(F("Blynk v" BLYNK_VERSION ": Device started"));
  terminal.println(F("-------------"));
  terminal.println(F("Type 'Marco' and get a reply, or type"));
  terminal.println(F("anything else and get it printed back."));
  terminal.flush();
}

void loop()
{
  Blynk.run();
}
Working video
Blynk Project built with Raspberry Pi :- Raspberry Pi + Node.js + Blynk App + DHT11/DHT22/AM2302
Blynk Project built with ESP8266 Standalone:- ESP8266-12 Blynk Wireless Temperature LM35 Sensor
Blynk Project built with Particle:- Temperature/humidity monitor with Blynk
Different Widgets available on Blynk
Widgets are interface components. When talking with the hardware, each of them performs a specific input/output role.
Widgets are classified into four types:
Controllers:- are used to send commands to your hardware.
Displays:- are used to visualize data from sensors and other sources.
Messages and notifications:- send messages and notifications;
Interface:- that execute certain GUI operations are referred to as interfaces.
Other:- widgets that do not fit into any of the categories.
I'll go over two widgets from each category so you can get a concept of what's available on the Blynk App. There are many widgets in each category, so listing them all would be tedious to read as well as a time-consuming chore to comprehend.
Controllers
- Button
Functions in both push and switch modes. Allows for the transmission of ON and OFF (LOW/HIGH) values. When pressed, the button sends 1 (HIGH) and when released, it sends 0 (LOW).
- Slider
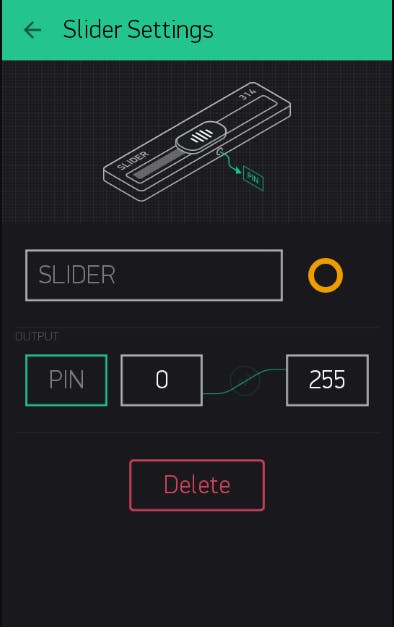
The same as a potentiometer. Allows you to submit values between a specified MIN/MAX range.
Displays
- Gauge
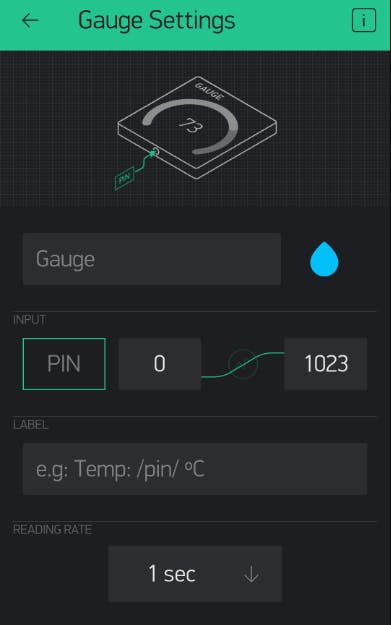
Numerical values are displayed visually.
- LCD
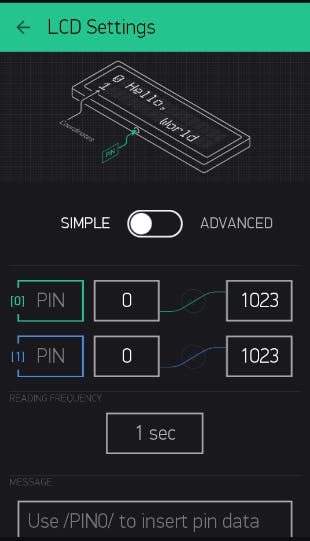
This is a standard 16x2 LCD display manufactured in the China-based secret plant.
Notifications
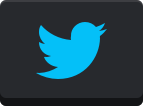
The Twitter widget connects your Twitter account to Blynk and enables you to send Tweets directly from your devices.

You can use the Email widget to send an email from your hardware to any address.
Interface
- Tab

The Tabs widget's sole purpose is to increase the size of your project. You can have up to four tabs open at the same time. You may also move widgets between tabs by dragging them. Simply drag the widget onto the label of the required tab of the tabs widget.
- Menu
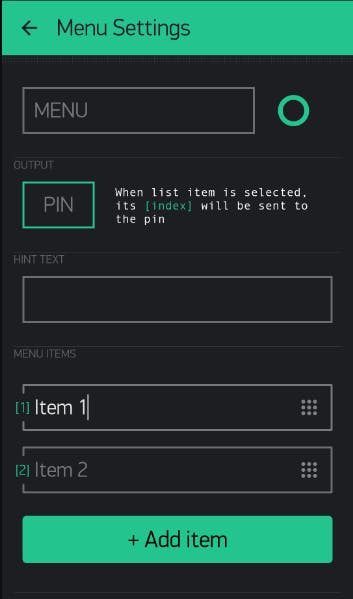
Menu widgets allow you to communicate commands to your hardware based on UI selections. The menu sends the index of the element you picked rather than the label string. The sending index begins at 1. It functions in the same way as the standard ComboBox element.
Blynk server
Blynk Server is an Open Source Java server that is in charge of transmitting communications between the Blynk mobile application and several microcontroller boards (i.e. Arduino, Raspberry Pi. etc)
👉🏻 Download it here 👈🏻
Hardware Supported
Platforms
Arduino
- Arduino MKR WiFi 1010
- Arduino MKR GSM 1400
- Arduino MKR NB 1500
- Arduino Uno, Duemilanove
- Arduino Nano, Mini, Pro Mini, Pro Micro, Due, Mega
- Arduino 101 (Intel Curie, with BLE)
- Arduino MKR1000
- Arduino Zero
- Arduino Yún (onboard WiFi and Ethernet, via Bridge)
- Arduino.org UNO WiFi
- Arduino MKR VIDOR 4000 (use the example for MKR WiFi 1010)
- Arduino UNO WiFi Rev.2 (use the example for MKR WiFi 1010)
Arduino-like
- Blynk Board
- ESP8266 (Generic, NodeMCU, Witty Cloud, Huzzah, WeMos D1, Seeed Wio Link, etc.)
- ESP32 (WiFi, BLE)
- Nordic nRF51/nRF52 - based boards
- Teensy 3.2/3.1
- Blue Pill (STM32F103C)
- Realtek RTL8710 / Ameba via RTLduino
- BBC micro: bit
- LightBlue Bean, soon
- DFRobot Bluno
- RedBear Duo (WiFi, BLE)
- RedBearLab Blend Micro
- RedBearLab BLE Nano (v1 and v2)
- Seeed Tiny BLE
- Simblee BLE
- RFduino BLE
- The AirBoard (BLE-Link, RN-XV)
- Feather M0 WiFi
- Feather 32u4 BLE
- Intel Edison
- Intel Galileo
- Fishino Guppy, Uno, Mega
- TinyCircuits TinyDuino (CC3000)
- Microduino/mCookie Core, Core+, CoreUSB
- Wicked WildFire V2, V3, V4
- Digistump Oak
- chipKIT Uno32
- Alorium XLR8 (FPGA)
- LinkIt ONE (WiFi only)
Particle
- Core
- Photon
- Electron
- RPi
- SparkFun RedBoard
- RedBear Duo (WiFi & BLE)
Energia
- Texas Instruments:- CC3220SF-LaunchXL, CC3200-LaunchXL, Tiva C Connected LaunchPad, Stellaris LM4F120 LaunchPad, MSP430F5529 + CC3100, LaunchPad MSP432.
- RedBearLab (CC3200, WiFi Mini)
Python
- MicroPython
- Python 2
- Python 3
JavaScript
- Regular PC with Linux / Windows / OS X
- Raspberry Pi (Banana Pi, Orange Pi, …)
- BeagleBone Black
- Onion Omega
- Onion Omega 2
- Intel Galileo
- Intel Edison
- Intel Joule
- LeMaker Guitar
- LeMaker Banana Pro
- Samsung ARTIK 5
- PandaBoard, CubieBoard, pcDuino, Tessel 2
- VoCore, VoCore2 (OpenWRT + Espruino package)
- Espruino Pico
Lua
- NodeMCU
Arduino connection types
USB (Serial), connected to your laptop or desktop
Ethernet
- Arduino MKR ETH
- Arduino Ethernet Shield (W5100)
- Arduino Ethernet Shield 2 (W5500)
- SeeedStudio Ethernet Shield V2.0 (W5200)
- ENC28J60-based modules
WiFi
- ESP8266 as WiFi modem (running original firmware)
- Arduino WiFi 101 Shield
- Arduino WiFi Shield
- WIZnet WizFi310
- Adafruit CC3000 WiFi Breakout / Shield
- RN-XV WiFly
Bluetooth Smart (BLE 4.0)
- HM-10, HC-08
- DFRobot BLE-Link module
- Microduino/mCookie BLE
- RedBearLab BLE Mini
- nRF8001-based boards (Adafruit Bluefruit LE, etc.)
Bluetooth 2.0 Serial Port Profile (SPP)
HC-05, HC-06, …
Cellular (GSM/3G/LTE)
- SIMCom SIM800 series (SIM800A, SIM800C, SIM800L, SIM800H, SIM808, SIM868)
- SIMCom SIM900 series (SIM900A, SIM900D, SIM908, SIM968)
- A6/A7
- M590
- BG96
- GPRSbee
- Microduino GSM
- Adafruit FONA (Mini Cellular GSM Breakout)
- Adafruit FONA 800/808 Shield
I hope you enjoyed reading about Blynk. I attempted to explain practically everything that a first-time Blynk user would require. Thank you very much!